Sunday, April 1, 2012

P.F. Changs-Style Chocolate Mousse Dessert Shooters


A couple of weeks ago the hubs and I had dinner at P.F. Changs and had the chocolate mousse dessert shooters for dessert. And I decided that I could make that deliciosity myself, for an upcoming occasion. And my copycat is a pretty good imitation, if I do say so myself. Remember though, quality ingredients are key to a quality dessert. Don't buy cheap chocolate.

For the shooter cups I used 2oz clear plastic shot glasses (bought them at Zurchers for about $3 for 50). For the mousse I used this recipe, but here's my compilation of the whole dessert:


Chocolate Mousse Dessert Shooters

Cake base:
1 brownie mix, prepared according to cake brownie directions

Mousse:
2 c chilled heavy whipping cream
4 large egg yolks
3 Tbsp sugar
1 tsp vanilla
7 oz fine-quality bittersweet (not semi-sweet) chocolate, chopped

Ganache:
1 c semi-sweet good quality chocolate chips
2/3 c heavy whipping cream

Garnish:
Sweetened whipped cream or the canned stuff
chocolate shavings (I used a potato peeler and shaved a chocolate bar)

Crumble the brownie into shot glasses, about 1/4" deep.
Heat 3/4 cup cream in a 1-quart heavy saucepan until hot. Whisk together yolks, sugar, and a pinch of salt in a metal bowl until combined well, then add hot cream in a slow stream, whisking until combined. Transfer mixture to saucepan and cook over moderately low heat, stirring constantly, until it registers 160°F on thermometer. Pour custard through a fine-mesh sieve into a bowl and stir in vanilla.
Melt bittersweet chocolate in a double boiler or a metal bowl set over a pan of simmering water (or in a glass bowl in a microwave at 50 percent power 3 to 5 minutes), stirring frequently. Whisk custard into chocolate until smooth, then cool.
Beat remaining 1 1/4 cups cream in a bowl with an electric mixer until it just holds stiff peaks. Whisk one fourth of cream into chocolate custard to lighten, then fold in remaining cream gently but thoroughly. 
Spoon over brownies into shot glasses until a little more than 3/4 full. Tap glasses on the counter to help settle the mousse into the cup evenly. Cover and chill at least 1 and a half hours.
Heat 2/3 cup cream on medium heat until it just quivers on the top. Pour hot cream over the semi-sweet chocolate chips in a bowl. Let sit for a minute until chips begin to melt, then whisk in the middle until chocolate incorporates and is glossy, then stir in the rest until incorporated. Let cool until it's a pourable but not hot consistency. 
Pour ganache over mousse in shot glasses until just below the rim (about 1-2 Tbsp.) Chill for at least an hour or two. Top with whipped cream and sprinkle with chocolate shavings.


Pin It

Tuesday, March 20, 2012

When to Plant???


I just came across this website, Sprout Robot, via Pinterest and I think it's the coolest thing since sliced bread. Being the amateur gardener that I am, I'm never quite sure when I should start planting my seeds. On this website, you type in your zip code, and it tells you what to plant when! How cool is that? Obviously I think it's pretty darn cool.


Since I grew four 50 lb pumpkins last year, I must have done something right. But eventually my beginners luck will run out and I will need some actual knowledge to back me up. So this is a great start! Pin It

Monday, February 27, 2012

The Origins of "Keep Calm"

Doubtless you've seen something with the Keep Calm and Carry On slogan, or some other play on the slogan. Well now you can read up on it's history. I knew it was a WWII poster, but didn't realize that they were never actually released. Find the article here.
Flickr photo by mediafury
 I love learning the history of such things. Do you? Pin It

Tuesday, February 14, 2012

Happy Valentines Day

This year we decided to keep it fairly simple. He got flowers for me, I made a cake for him (and Ava made a card). It's a 4 layer cake (2 layers strawberry cake and 2 layers white cake) with a mousse frosting. The frosting is what makes this so delicious. Two cups of milk, two cups of Cool Whip, and two 4oz boxes of pudding*. I was out of red food coloring (oops!) so I improvised and added a little strawberry Jello to the frosting to give it a hint of pink. Refrigerate the cake for a few hours and that moist pudding starts to soak into those layers and Mmmm, it's delicious. We also went to a movie tonight, which is something we haven't done for about a year and a half. Quite enjoyable. Hope your day was too!

*I usually don't care for processed ingredients, but I've tried this with real whipped cream and I prefer the less rich, light and fluffy taste that the Cool Whip gives it. Homemade pudding would probably be better, but who has the time? Pin It

Wednesday, February 8, 2012

Disney Family Fun

I'm so excited to share with you this next project! Are you familiar with Disney's FamilyFun magazine? (they also have an iPad app) It's loads of fun. And for the last several months they have been doing something called Badges of Fun. The idea is that the kids collect a new badge each month when they complete a specific "challenge", and put it on a printable poster. Each badge represents an activity the kids are to do.
Are you wondering why I'm telling you all this? It's because I got to design the badge for the month of March! They have been approaching artist/bloggers to design these badges and there is a wonderful variety of them. For March, the badge represents Eat Dinner Together as a Family. Using my Colored Spoon technique, I created a family of silverware to represent family mealtime. And here's the badge:

From their website you can download each badge and cut it out and put it on your poster, like so:

It was a fun project to do and they were really great to work with. When I was in high school my plan was to study Illustration in college and then become an animator for Disney. Though my plans changed some, I guess you could say that in a sense I've now fulfilled that dream of working for Disney! So thank you, Family Fun Magazine! Pin It

Sunday, February 5, 2012

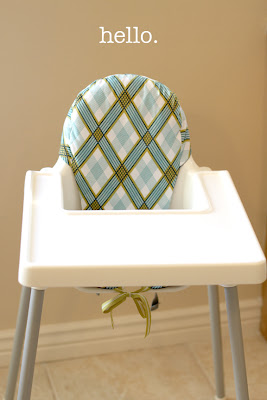
Antilop Highchair Cushion—Take 2


You may or may not remember that I previous had made a highchair pad/cushion for my IKEA Antilop high chair (see here). Now I've made a boy version, since I can't have my little guy eating in a girly chair.
I used the same pattern as the first time, but forgot to make one change. I wish I had sewn some ribbon straps on where the back meets the seat. Sometimes when I put him in the chair, the cushion slides forward under him, and it would be nice to have some ties to tie the rear in place (there are 2 slits they could slide through—where the buckle straps feed through).
The fabric I used was left over from my crib skirt, and I've gotten a lot of mileage out of that material. It's from the Joel Dewberry collection called Modern Meadow. For the back/lining I just used an old navy blue t-shirt and recycled it into this. The whole thing cost me $0. Pin It

Tuesday, January 24, 2012

Toddler Hair Clips

Recently I made these felt bow clips for my 2 yr. old. They are just alligator clips with the bows glued on. Simple as can be.
I also made a satin bow clip with some leftover ribbon I had.

Pin It