Sunday, September 30, 2012

Let the Halloweening Begin!

Now that it's finally October, I'm picking my pumpkins and focusing on Halloween! (Okay, so I started focusing on Halloween in July, but I mean really focusing now). So of course I must kick off the month with my first Halloween craft.

Halloween Craft No. 1: Black Bottles

Nothing says Halloween like the color black. And orange. Just round up some bottles from around the house (maple syrup, sparkling grape juice, red wine vinegar, etc.) plus a few from the thrift store if you need (mine were $.50 - $1 ea.) You may need some Gu Gone to help get the stickies off. You can mask some to create a color block look, or just add a few coats of glossy black spray paint and ta-da! A creepy black display of bottles for your shelves or tables. Fill them with candy or black twigs... or spiders and bones.

Just for fun, here's a BEFORE photo of some of the bottles. Eeeew.


Pin It

Friday, September 28, 2012

Pinterest Weekly Round-up

Here are a few fun things I found on Pinterest this week:


Cloud Stickers. You could easily make these yourself too, though they are inexpensive to purchase. And think of all the cute shapes you could put on your kid's lunch sacks! 

Stroller Caddy (I want): 


Bow tie bib. So cute!


Follow Me on Pinterest
Pin It

Monday, September 24, 2012

Nightstand Makeover

I usually get so excited and rushed to start a new project that I forget to take "Before" pictures, as is the case with this one. I bought this mahogany nightstand off the classifieds for $30. A little spray paint and a new handle, and this is what we have now. It's for Ava's room.

See that little ball clock on the right? That's an Ok To Wake alarm clock. It's the greatest thing ever (for toddlers). You set an alarm time on it, and when it hits that time the ball glows green, letting your toddler know that it's ok to get out of bed now. It took a few months for Ava to get the hang of it, but now it's a beautiful thing. It helps her to sleep in a little more if she gets to bed late (she used to always wake up at the same time no matter what time she went to bed). Can you tell I'm a fan?

Pin It

Wednesday, September 19, 2012

Garden Jalapeño Recipes


I have a small garden, but in my small garden I have one thriving jalapeño plant. While my husband devours salsa like it's chocolate, I still can't keep up with how many peppers I'm getting. And I know I'm not the only one. So I've been trying a number of recipes using jalapeños and I thought I'd share a few that I like.

If you're a sissy about hot foods like me, just make sure you get all the seeds out and you'll be fine. Without the seeds, none of these are very hot on the tongue, they just have a tiny little kick and a good flavor.

Delicious Black Bean Burritos

This one is fast and easy and I've been making it for years.

2 10" flour tortillas
2 T vegetable oil
1 small onion, chopped
1/2 red bell pepper, chopped
1 t minced garlic
1 15oz can black beans, rinsed & drained
1 t minced jalapeño pepper
3 oz cream cheese
1/2 t salt
2 T chopped fresh cilantro

Wrap tortillas in foil & place in oven heated to 350 degrees. Bake for 15 minutes or until heated through. Heat oil in a 10" skillet over medium heat. Add onion, bell pepper, garlic & jalapeños; cook for 2 minutes, stirring occasionally. Pour beans into skillet and cook 3 minutes, stirring. Cut cream cheese into cubes & add to skillet with salt. Cook 2 minutes, stirring occasionally. Stir cilantro into mixture. Spoon mixture evenly down center of warmed tortillas & roll up tortillas. Serve immediately.

[If you're in a hurry you can buy chopped onions and pepper in the freezer isle, and pre-minced garlic in a jar, usually in the produce section].
(Says it serves 2 but I usually double the recipe)

Amount Per Serving  Calories: 692 | Total Fat: 35.8g | Cholesterol: 47mg


Esfiha Open Meat Pies

This is a meal I became familiar with while living in Brazil, though it's of Arabic origins. I love them, but if you don't like to try new things this might not be for you.

2lbs frozen dough, thawed (or equivalent amount of homemade dough)
2 lbs lean lamb or ground beef
4 T butter
1 small bunch green onions, finely chopped
4 T finely chopped cilantro
3 cloves garlic, crushed
1 jalapeño pepper, very finely chopped
2 t salt
1 t oregano
3/4 t pepper
4 medium tomatoes, chopped, divided

Serve with lime wedges

Form dough into 20 balls, then cover with a damp cloth and allow to rest for one and a half hours. In the meantime, thoroughly mix the remaining ingredients, except for half of the tomatoes. Divide into twenty equal portions and set aside.
Roll dough balls into circles about 4" in diameter, leaving a raised edge around the outside of the circles (like a pizza crust). Spread one portion of the mixture around the inside. Continue for all twenty. (They will look like mini meat pizzas).
Place on well-greased jelly-roll pans or rimmed cookie sheets and bake in a 350 degree oven for 20 minutes. Remove and decorate with remaining tomatoes and return to oven for an additional 15 minutes; serve piping hot, with lime wedges (I squeeze lime juice over mine before eating them).


Orange Chicken

This recipe comes from The Feed Zone Cookbook Fast and Flavorful Food for Athletes. It's included in the Aprés section, meaning it's best eaten within 30 minutes after exercise to aid in "properly restoring muscle glycogen stores and speeding up the recovery process." It's also just a good dish for any day of the week though, I think. If you are an active athlete, I recommend this book.

2 c uncooked calrose or medium grain rice
1 1/2 c water
1 lb boneless, skinless chicken, cut into bite-size pieces
1 c rice flour
1/2 c red cabbage
1/4 c red onion, thinly sliced
1 jalapeño, thinly sliced

Dressing:
1/4 c orange marmlade
1 T soy sauce
1 t chili sauce (or to taste)

Combine rice and water in rice cooker (mine requires a little more water than the recipe calls for, but don't over-do it or your rice won't be sticky).
While rice is cooking, dust chicken pieces with rice flour in a bowl or large ziplock bag.
In a lightly oiled medium sauté pan, cook the chicken until lightly browned, about 5 minutes.
Add cabbage, onion, and jalapeño and sauté until all are softened, about 3-5 minutes. Remove pan from heat.
To make dressing: In a small bowl, whisk together orange marmalade, soy sauce, and chili sauce.
Pour dressing over chicken and vegetable mixture and stir well to incorporate. Add salt and pepper to taste. Serve over rice

(When it comes to chicken and rice dishes I often double the sauce. You don't have to use it all, but if you want more, then it's there).

Serves 4


I'd love to hear your favorite recipes too! Please feel free to share!

Pin It

Tuesday, September 4, 2012

Stripes and Felt Baby Shoes

My friend Merrilee is having her first baby girl soon. I wanted to give her something handmade, because she is a super talented designer, illustrator, seamstress, and do-it-all girl. This was my first attempt at baby shoes, and it was a fun project to take on.


I also made a couple of little felt bow clips, because every little girl needs hair accessories. And her little one will probably have enough hair to actually use them.


For the gold roses on the shoes, I roughly used this pattern from Purl Bee, but I shrunk it quite a bit. The dusty pink rose was made from felt rick-rack and I just kind of twirled and twisted and stitched it together until it looked good. Now I kind of want to make more baby shoes and perfect the art!

Pin It

Tuesday, August 28, 2012

Camp T-Shirt

Okay, this is way overdue, but about a month and a half ago I designed this t-shirt for our youth Girl's Camp. The theme was Arise and Shine Forth, so of course that's what was on the t-shirt as well.


I was going for a kelley green shirt but the final product turned out to be somewhere between emerald and kelley green. You can see it here, as some of our girls are doing a skit (which was quite hilarious by the way). When I grew up going to camp slept it tents and cooked over fires. Here we slept in cabins and had a camp cook to make our meals for us! Hardly camping, if you ask me, but still lots of fun.


Pin It

Friday, July 20, 2012

Wedding Decor Round-up

I've been helping to gather some ideas for my brother-in-law's upcoming wedding—specifically centerpieces and decor for the luncheon. These are ideas that you could use and customize to many different kinds of parties or gatherings.

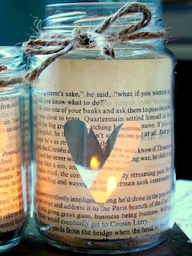
1. Mason jars—or any mixture of collected jars in varying sizes. Pickle jars, jam jars, baby food jars, salsa jars, etc. So many ways to pretty them up. Wrap them in lace, in twine, in old book pages or sheet music (which could be photocopied by the way), dye them, put candles in them, put in sand and candles, glass stones and water, put in flowers, simple mini daisies, etc.


2. Tissue paper pom-pom flowers.  These are everywhere, of course, but there's a reason for that. They cost little and make a big impact. You can hang them from the ceiling, do half flowers and attach them the to walls, make a variety of sizes and create a centerpiece (using the half spheres). Throw in some white Christmas lights and tulle for added flair.


3. Flower filled boots. For this particular wedding the bridesmaids are wearing cowboy boots. If the family happens to own a lot of boots, they could cut off the top of some 2-liter bottles and put them inside the boots, fill with water and then flowers. Short boots might work for a centerpiece, tall boots could be a nice touch if they were flanking the entrance or maybe even a buffet table.


4. Japanese lanterns filled with flowers. I believe Costco sells some battery powered tea lights, and those could be the light source inside. And you can be sure those Japanese lanterns will get future usage for party decor.

5. Rolled paper tubes. Print something lovely on white paper or translucent vellum and roll it up and put a battery powered tea light inside for a warm glow.


6. Balloons on the wall. You need to make sure they are nice balloons. This is the kind of arrangement I was referring to with the tissue paper flowers on the wall as well.


9. Another wall idea—wrapping paper pinwheels. I'm not sure if thats what it's really called, but here they are. A good, inexpensive way to cover a lot of surface area and fancy things up. These papers were bought at XPedX, I believe.


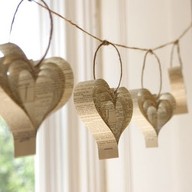
8. Book page/music sheet heart garland to string across the room using twine (in this case).


9.Lace doily bowls. Form them around balloons, bowls, etc. Fill them with... candy? mints? anyone have any ideas?


10. Branch and leaf. Get some 4x4's at the hardware store and drill small holes in the top. (Probably want to sand and stain it too). Branches with or with out leaves could be cool. Spray paint them gold, or in your colors.

11. Glass in glass with colored water. These large vases have a narrower vase inside them holding the candle. Between the two layers they have been filled with colored water.


12. Layered paper plates. The top plate has been cut around with decorative scissors, then punched with some fancy punches.

13. Tin can vases. I love the simple flowers in these. You could also wrap them in butcher paper (maybe trimmed with decorative scissors?) and wrap with twine or thin leaves as seen below.

14. Paper flowers. These might take some time, but wow.


(Some of these images have links, some do not—sorry about that.) Pin It