Showing posts with label clothing. Show all posts

Thursday, April 11, 2013

Children's Maxi Skirt Giveaway!

I've recently started working with my sister's company on some clothing designs for children. Our first round is these chevron maxi skirts for girls. We are pretty pleased with how they turned out. Do you like them? I am giving away one skirt in your choice of size and color! All you have to do is Pin it to win it! Oh, and leave a comment letting me know that you pinned to your Pinterest board, and you'll be entered in the drawing (You can either pin from here or from 500Babies.com). Even if you don't have a little girl, these make a great gift for a friend or grandchild or niece. The winner will be announced on April 19th.
Ava has the red and grey one and always gets lots of compliments when she wears it.
If you want to buy one you can purchase them at 500Babies.com. They are available in sizes 12M to 5T.
I can't wait until our next set of designs are finished, I'm very excited about them! Of course I will share when that time comes.

AND THE WINNER IS....
Ashley! 
Congratulations! I will contact you to work out the details. 


Pin It

Wednesday, March 6, 2013

Polar Bear DIY Graphic T-shirt


I had a $4 red t-shirt for Ezra that needed some personality. I decided to try a 2-step 2 color process with the freezer paper stencil this time. And I will tell you, I didn't go very well. I managed to make it work with some touch up, but I probably won't be doing that again. And I forgot to put the middle in that back wheel, oh well. Its still better than it was as a plain red T-shirt.
I based this design loosely on a pen and ink illustration that I did a couple of years ago.


Pin It

Sunday, February 10, 2013

DIY JCrew Heart Tee

A while back I saw these cute purple and red oversized-heart shirts at JCrew and they were super simple. (Now they've moved on to sequins). So being the DIY kinda girl I am, I decided to just make one. JCrew had the solid colored kids shirts on sale for like $6, so I bought the purple shirt from them. Then it was just a matter of another freezer paper stencil and some fabric paint!


Here's a tip: I bought 2 different colors of red fabric paint because I couldn't decide, but one turned out to be a "pearl" finish. Fortunately I put down one layer of the matte red color first, because the pearl paint is a bit transparent. I wish I had put down 2 layers of matte and then a layer or two of pearl over top. I like the shimmer/glitter the pearl gives, but it took about 6 layers of the stuff to get an even, solid, professional-looking finish.
Ever since this project, Ava is obsessed with Valentines Day and asks me every day to show her on the calendar when it is! Pin It

Tuesday, May 24, 2011

Not Too Shabby Knock-off

I recently saw this dress at Shabby Apple, and loved it. The price, however, I did not love. Especially for the quality. I think if you are going to pay that much for a little kid dress, the quality had better be pretty good.

And then today I saw this great tutorial and pattern by Kelly on how to make your very own. And it looks pretty simple!
Thanks for sharing, Kelly!
Pin It

Sunday, January 9, 2011

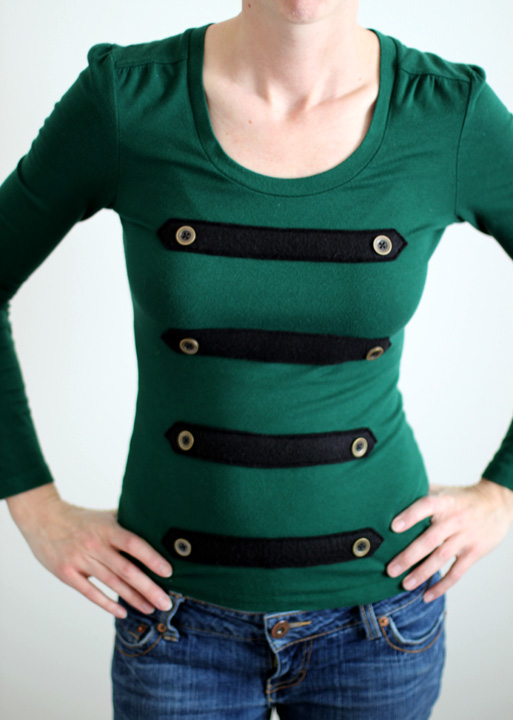
Military T-shirt DIY

Does everyone know what DIY stands for? I had someone ask me that once. Do-It-Yourself.
So here's a DIY that's as easy as one-two-three... four.
This idea came about from seeing 45 seconds of the show Cougar Town one night. One of the girls had on a pink slouchy T-shirt with basically this pattern of military design on it. I've had this green shirt that's a bit too tight, and this seemed like a good update and a way to mask the too-tightness.

So here's what you'll need:
One T-shirt; about 1/16 if a yard of fleece, flannel, or felt; 8 buttons (mine are antiqued gold color)

Step 1. Cut.
Cut 4 equally sized strips of your fleece/flannel/felt. (I recommend creating a simple pattern for yourself using wax or parchment paper. Or wrapping paper. Or anything.)

Step 2. Pin.
Put on your shirt and decide where you want your top strip and bottom strip to sit. Loosly pin those two on and carefully remove the shirt (and put on another one). Lay the shirt flat and now adjust your top and bottom strips so they are level, and pin in place. Evenly space the middle 2 strips and pin in place.

Step 3. Sew.
With strips in place, sew them onto the t-shirt, stitching around the outside edges.

Step 4. Buttons.
With a needle and thread, sew on your buttons, one at each end of each strip.
That's it! You're done! Now go show off your new shirt (and send me pictures!).

Pin It

Monday, February 22, 2010

Little Gentleman's Vest

Dana over at Made has done it again. She's amazing. Check out this adorable sweater-turned-vest! You know how I love upcycling! Here's the link.

Oh, and she has a tutorial of how to do this. Pin It

Saturday, July 18, 2009

Striped Ruffle Skirt

Here's a little stripey skirt I finished last weekend. I may have gone a little too wide with the ruffles, but I was making it up as I went. I got this fabric on sale a while ago and finally decided what to do with it. I'm guessing this is a size 9-12 month. Pin It

Saturday, June 27, 2009

Baby Skirt

Remember that diaper bag I made a while back? Well I used the last remnants of the material to make this little baby skirt. I'm showing it with the top it will be paired with, with a onsie underneath, of course. Super easy project. Pin It

Monday, June 1, 2009

Ruffle Onesie

Oh yeah, I'm definitely going to be making some of these. Doesn't look too comfy for sitting, but real cute for the crawling stage, right? I see some great possibilities. Go to this site for the tutorial.
Pin It

Tuesday, March 17, 2009

Prego Pants Conversion

I hate anything tight around my waist or my guts. So gaining just a couple of pounds has made sitting all day in my old pants a little less than comfortable. I went out one evening and tried on about 25 different maternity pants, to see if they might fit already and give me more comfort. It was a total failure. I still have no hips, and that is proving to be a challenge.
So I took an old, unfavorite pair of Ann Taylor pants I had and decided to convert them myself. Combining an old cami with the pants, I turned them into maternity pants that fit me. The pictures on the floor make the pants look short and wide, but they aren't really. Due to an uncooperative husband, I am not smiling.

See my growing belly? Pin It

Thursday, August 21, 2008

Mama's little monkey

One more baby item today. Check out the cool stencil miss K. picked up at a show in Chicago. You can find more awesome stencils like this at Stencil 1. I still had some onsies left from that elephant applique one I tried to make for my sister's baby, so I put one to use.


A blurry close-up:

Another of many cool images available on Stencil 1:

Pin It

Tuesday, August 19, 2008

I love stripes!


Ok, I just stumbled accross this site and I have to share. You can get striped tights in a billion color options! I love striped tights. I don't own any, but soon I hope to, because I really really love them! Pin It

Thursday, July 3, 2008

Katsai on Etsy

I want, I need, I wonder...
if I could make this?
Not sure I'm up to that level yet, but maybe I'll try. Found this lovely little item on Katsai's Etsy site. Pin It